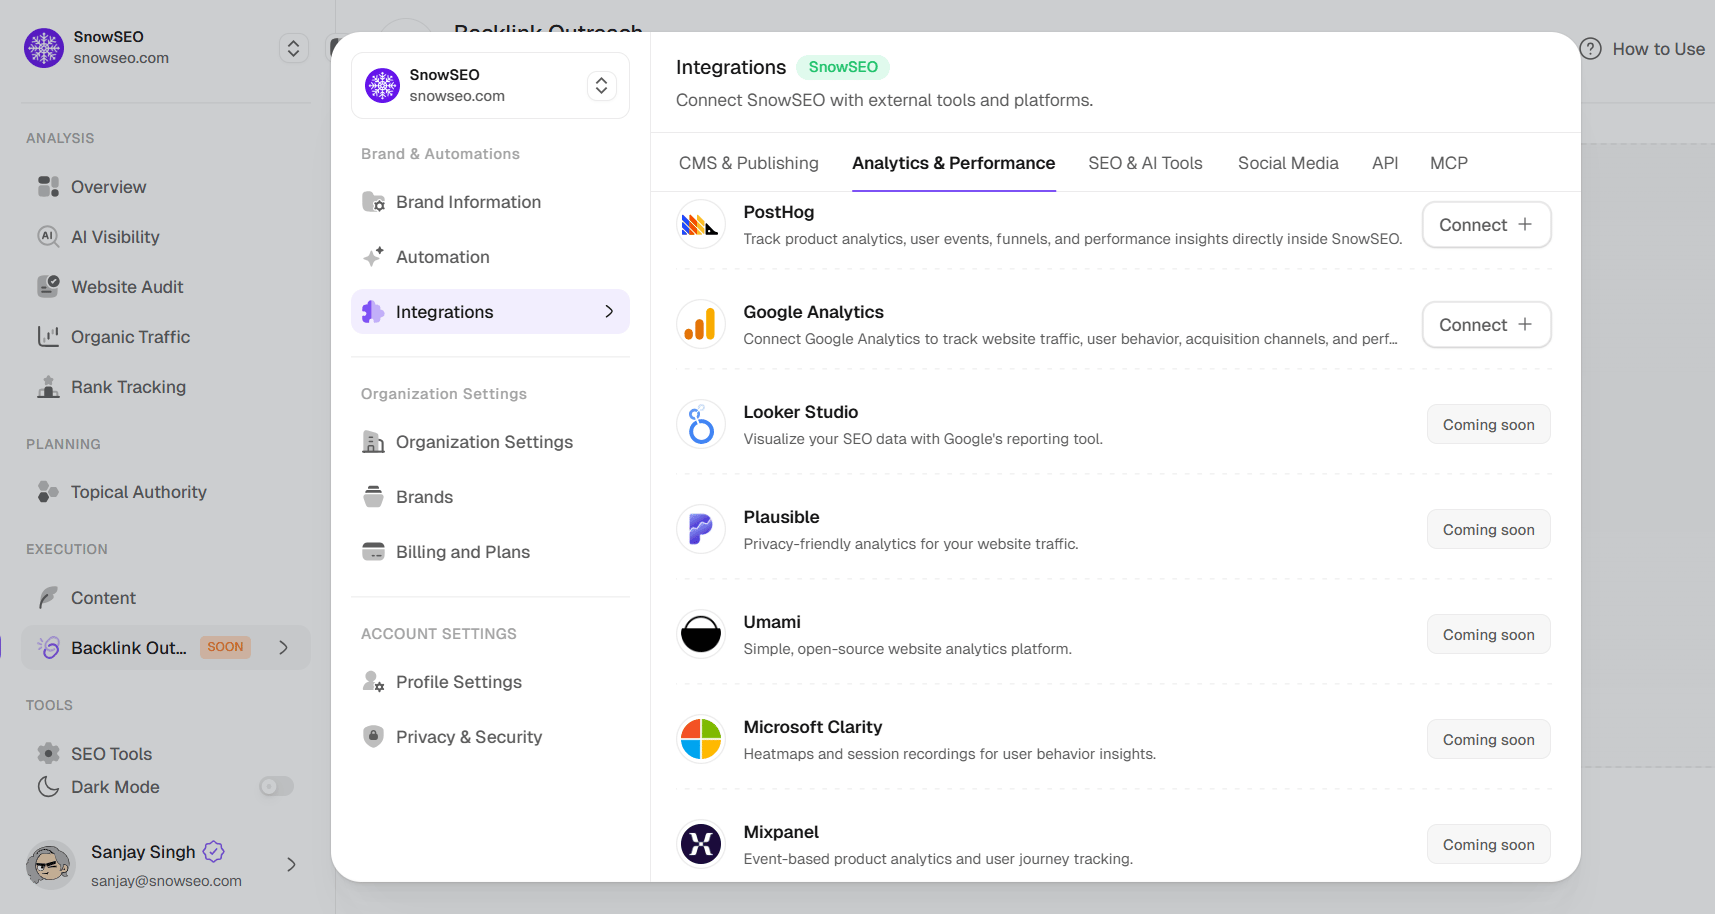
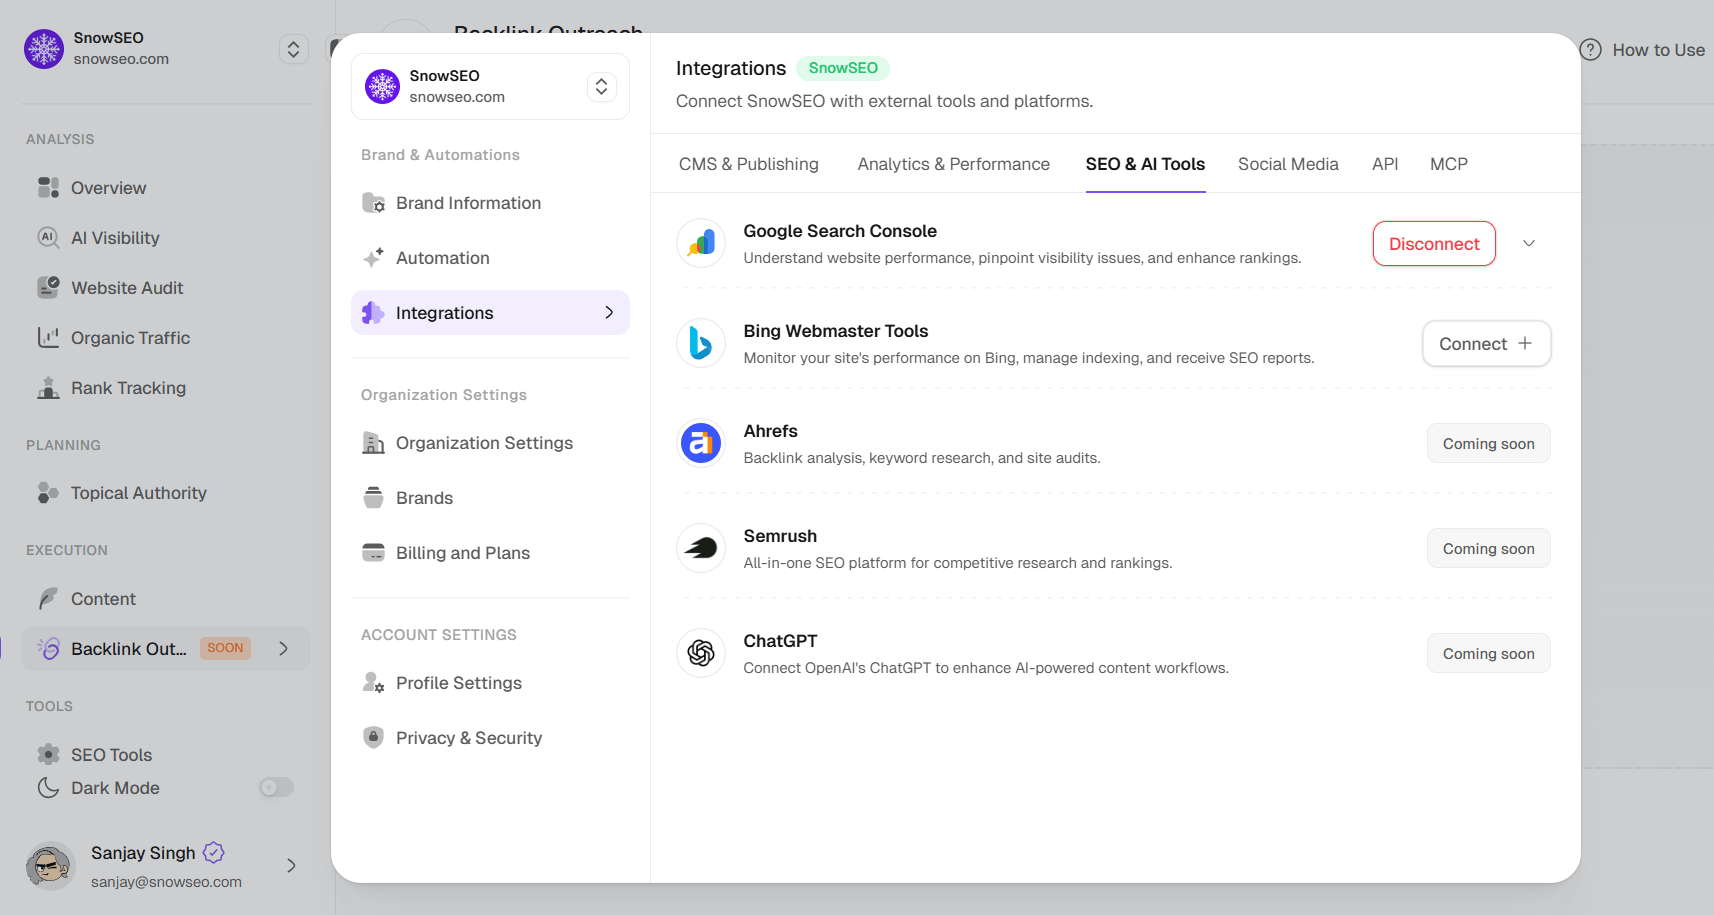
The **CMS & Publishing** tab lists content management platforms you can connect for direct article publishing. Once linked, you can push SEO-optimized articles from SnowSEO straight to your live website.
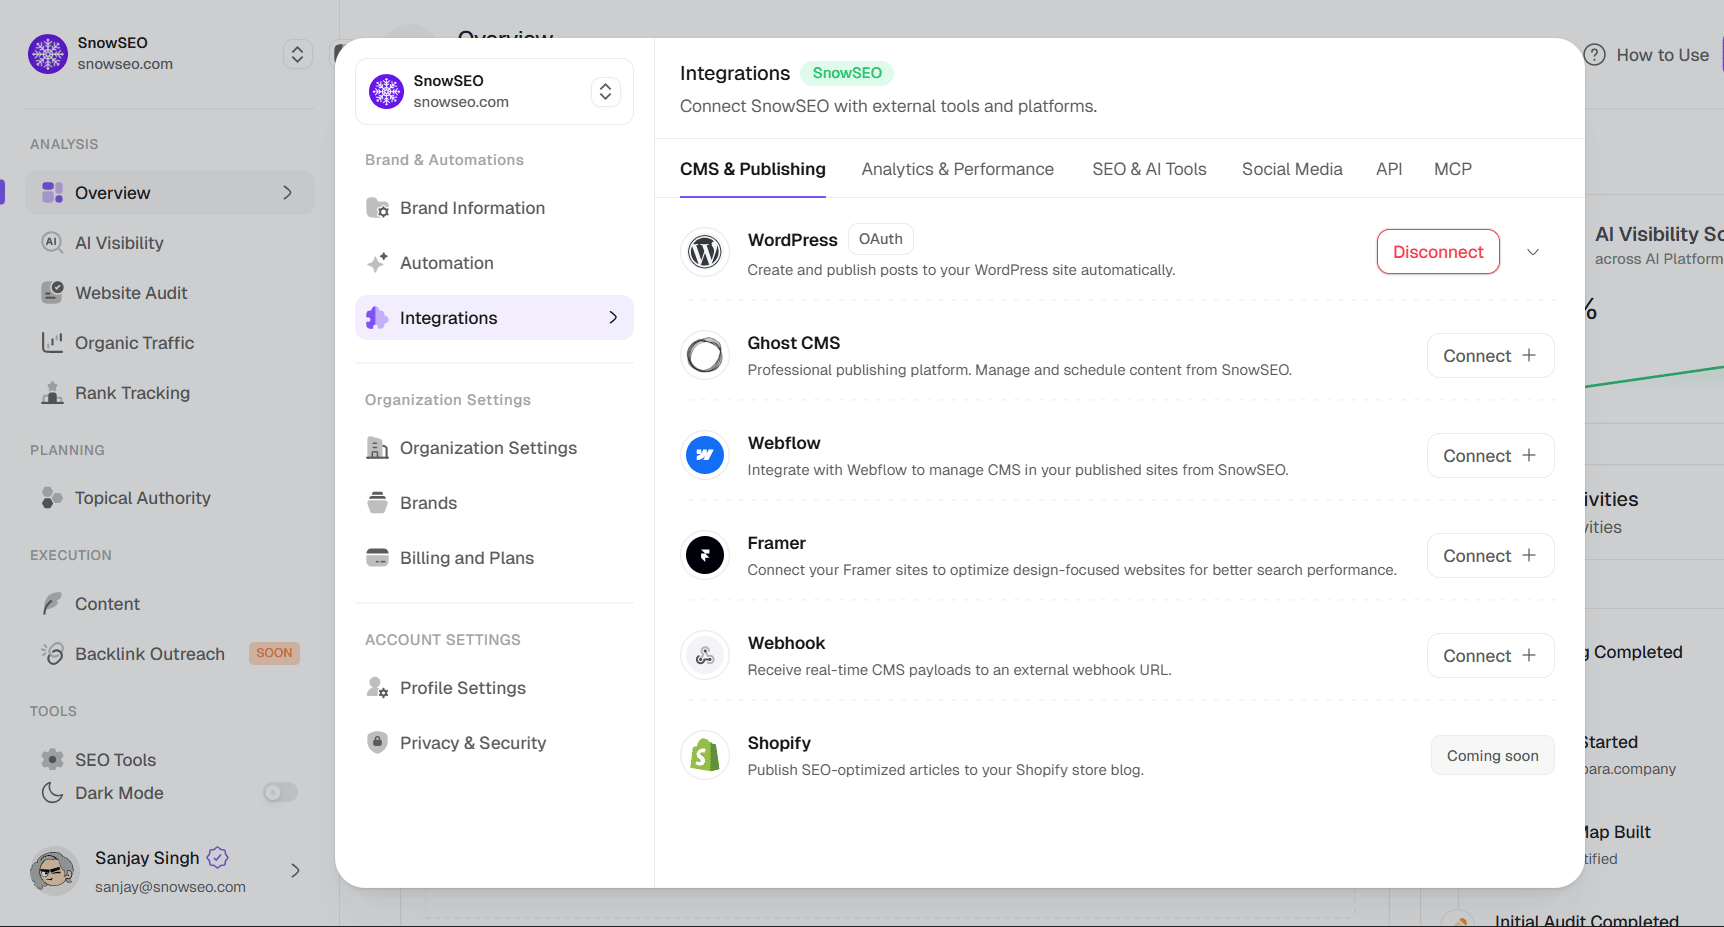 Connecting a CMS unlocks the **Publish Now** and **Schedule** buttons inside the Article Editor. Without it, you can still write and optimize content — but you'll need to manually copy the output to your website.
***
### WordPress
Connect your WordPress site to create and publish posts directly from SnowSEO. Supports both **WordPress.com** and self-hosted **WordPress.org** installations.
**WordPress Connection Prerequisites & Common Issues:**
* **WordPress Version**: You must be running **WordPress 5.6 or higher**. Older versions do not support Application Passwords or the REST API v2 needed for the OAuth and Password methods.
* **REST API Blocks**: Security plugins (like **Wordfence**, **iThemes Security**, or **Sucuri**) and some hosting configurations can block the WordPress REST API. Make sure `/wp-json/` endpoints are accessible.
* **Disabling Security Blocks**: If you use Wordfence, ensure it is not blocking Application Passwords (you may need to allow them in Wordfence settings or temporarily disable the plugin to connect).
* **Fallback to Plugin Method**: If your firewall or security setup strictly blocks the REST API, use the **Plugin** method which is designed to bypass these restrictions.
SnowSEO offers **three connection methods** — choose based on your hosting setup:
**Best for:** WordPress.com sites and self-hosted sites where the WordPress REST API is accessible.
This is the simplest method — no manual credential management required.
Connecting a CMS unlocks the **Publish Now** and **Schedule** buttons inside the Article Editor. Without it, you can still write and optimize content — but you'll need to manually copy the output to your website.
***
### WordPress
Connect your WordPress site to create and publish posts directly from SnowSEO. Supports both **WordPress.com** and self-hosted **WordPress.org** installations.
**WordPress Connection Prerequisites & Common Issues:**
* **WordPress Version**: You must be running **WordPress 5.6 or higher**. Older versions do not support Application Passwords or the REST API v2 needed for the OAuth and Password methods.
* **REST API Blocks**: Security plugins (like **Wordfence**, **iThemes Security**, or **Sucuri**) and some hosting configurations can block the WordPress REST API. Make sure `/wp-json/` endpoints are accessible.
* **Disabling Security Blocks**: If you use Wordfence, ensure it is not blocking Application Passwords (you may need to allow them in Wordfence settings or temporarily disable the plugin to connect).
* **Fallback to Plugin Method**: If your firewall or security setup strictly blocks the REST API, use the **Plugin** method which is designed to bypass these restrictions.
SnowSEO offers **three connection methods** — choose based on your hosting setup:
**Best for:** WordPress.com sites and self-hosted sites where the WordPress REST API is accessible.
This is the simplest method — no manual credential management required.
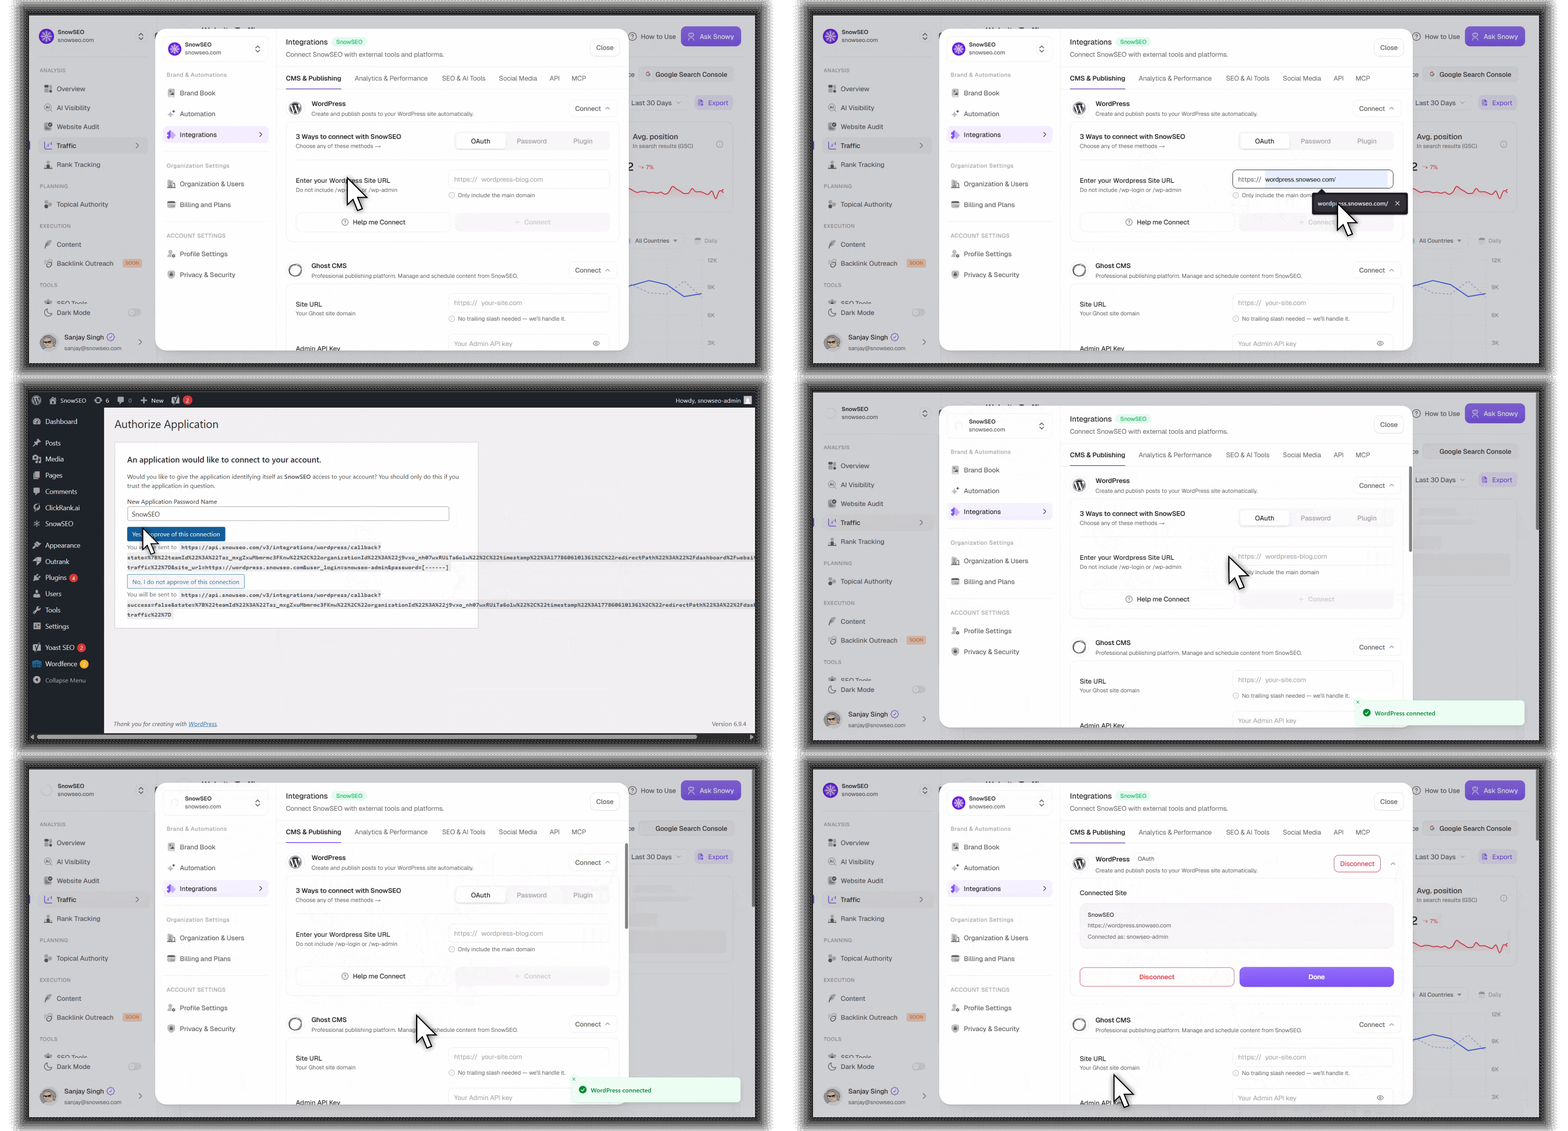 In SnowSEO, find WordPress in the CMS & Publishing tab and click **Connect +**. The panel expands with three tab options.
It's selected by default. You'll see a single field: **Site URL**.
Type the main domain of your WordPress site (e.g., `wordpress-blog.com`). Do **not** include `/wp-login`, `/wp-admin`, or `https://` — those are added automatically.
Click **+ Connect**. A secure WordPress authorization window opens where you sign in to your WordPress admin and grant SnowSEO permission. Once authorized, the status changes to **Connected**.
OAuth is the fastest method. Try it first — if your WordPress site blocks the REST API (common with certain hosting providers or security plugins), fall back to the Password or Plugin method.
**Best for:** Self-hosted WordPress.org sites where OAuth is blocked or unavailable.
Uses an **Application Password** — a revocable token generated inside WordPress, not your main login password.
In SnowSEO, find WordPress in the CMS & Publishing tab and click **Connect +**. The panel expands with three tab options.
It's selected by default. You'll see a single field: **Site URL**.
Type the main domain of your WordPress site (e.g., `wordpress-blog.com`). Do **not** include `/wp-login`, `/wp-admin`, or `https://` — those are added automatically.
Click **+ Connect**. A secure WordPress authorization window opens where you sign in to your WordPress admin and grant SnowSEO permission. Once authorized, the status changes to **Connected**.
OAuth is the fastest method. Try it first — if your WordPress site blocks the REST API (common with certain hosting providers or security plugins), fall back to the Password or Plugin method.
**Best for:** Self-hosted WordPress.org sites where OAuth is blocked or unavailable.
Uses an **Application Password** — a revocable token generated inside WordPress, not your main login password.
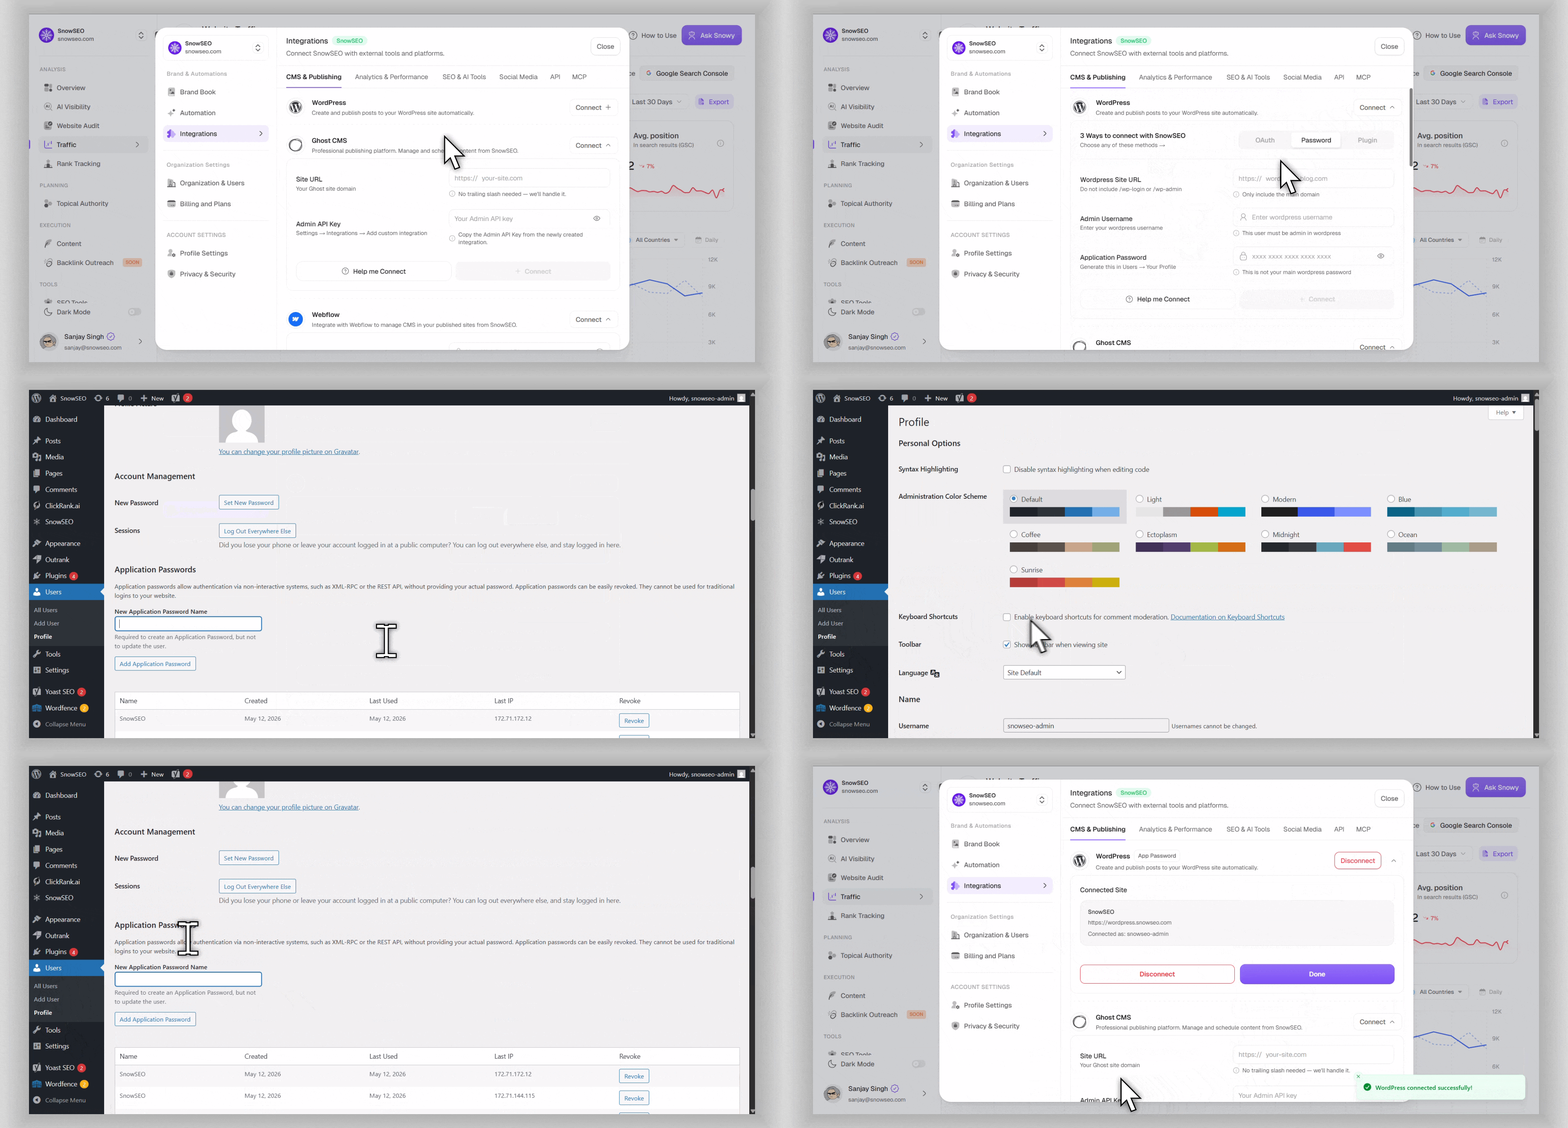 In SnowSEO, expand the WordPress panel and select the **Password** tab.
Type your site's main domain (e.g., `wordpress-blog.com`). No protocol, no `/wp-admin`.
Type the WordPress username you log in with. This user **must have admin privileges**.
In your WordPress admin:
1. Go to **Users → Your Profile**
2. Scroll to the **Application Passwords** section
3. Type a name (e.g., "SnowSEO") and click **Add New Application Password**
4. Copy the generated password — it looks like `xxxx xxxx xxxx xxxx xxxx xxxx`
Back in SnowSEO, paste the generated password into the **Application Password** field (use the eye toggle to reveal/hide it). Click **+ Connect**.
The Application Password is **not** your WordPress login password. It's a separate, revocable credential for third-party access. You can revoke it anytime from your WordPress profile without affecting your main login. If you revoke it, the SnowSEO integration will break — just generate a new one and reconnect.
**Best for:** Sites behind firewalls, using non-standard hosting, or where security plugins block REST API access.
Uses a dedicated SnowSEO WordPress plugin with a site token (API key) for the most reliable connection.
In SnowSEO, expand the WordPress panel and select the **Password** tab.
Type your site's main domain (e.g., `wordpress-blog.com`). No protocol, no `/wp-admin`.
Type the WordPress username you log in with. This user **must have admin privileges**.
In your WordPress admin:
1. Go to **Users → Your Profile**
2. Scroll to the **Application Passwords** section
3. Type a name (e.g., "SnowSEO") and click **Add New Application Password**
4. Copy the generated password — it looks like `xxxx xxxx xxxx xxxx xxxx xxxx`
Back in SnowSEO, paste the generated password into the **Application Password** field (use the eye toggle to reveal/hide it). Click **+ Connect**.
The Application Password is **not** your WordPress login password. It's a separate, revocable credential for third-party access. You can revoke it anytime from your WordPress profile without affecting your main login. If you revoke it, the SnowSEO integration will break — just generate a new one and reconnect.
**Best for:** Sites behind firewalls, using non-standard hosting, or where security plugins block REST API access.
Uses a dedicated SnowSEO WordPress plugin with a site token (API key) for the most reliable connection.
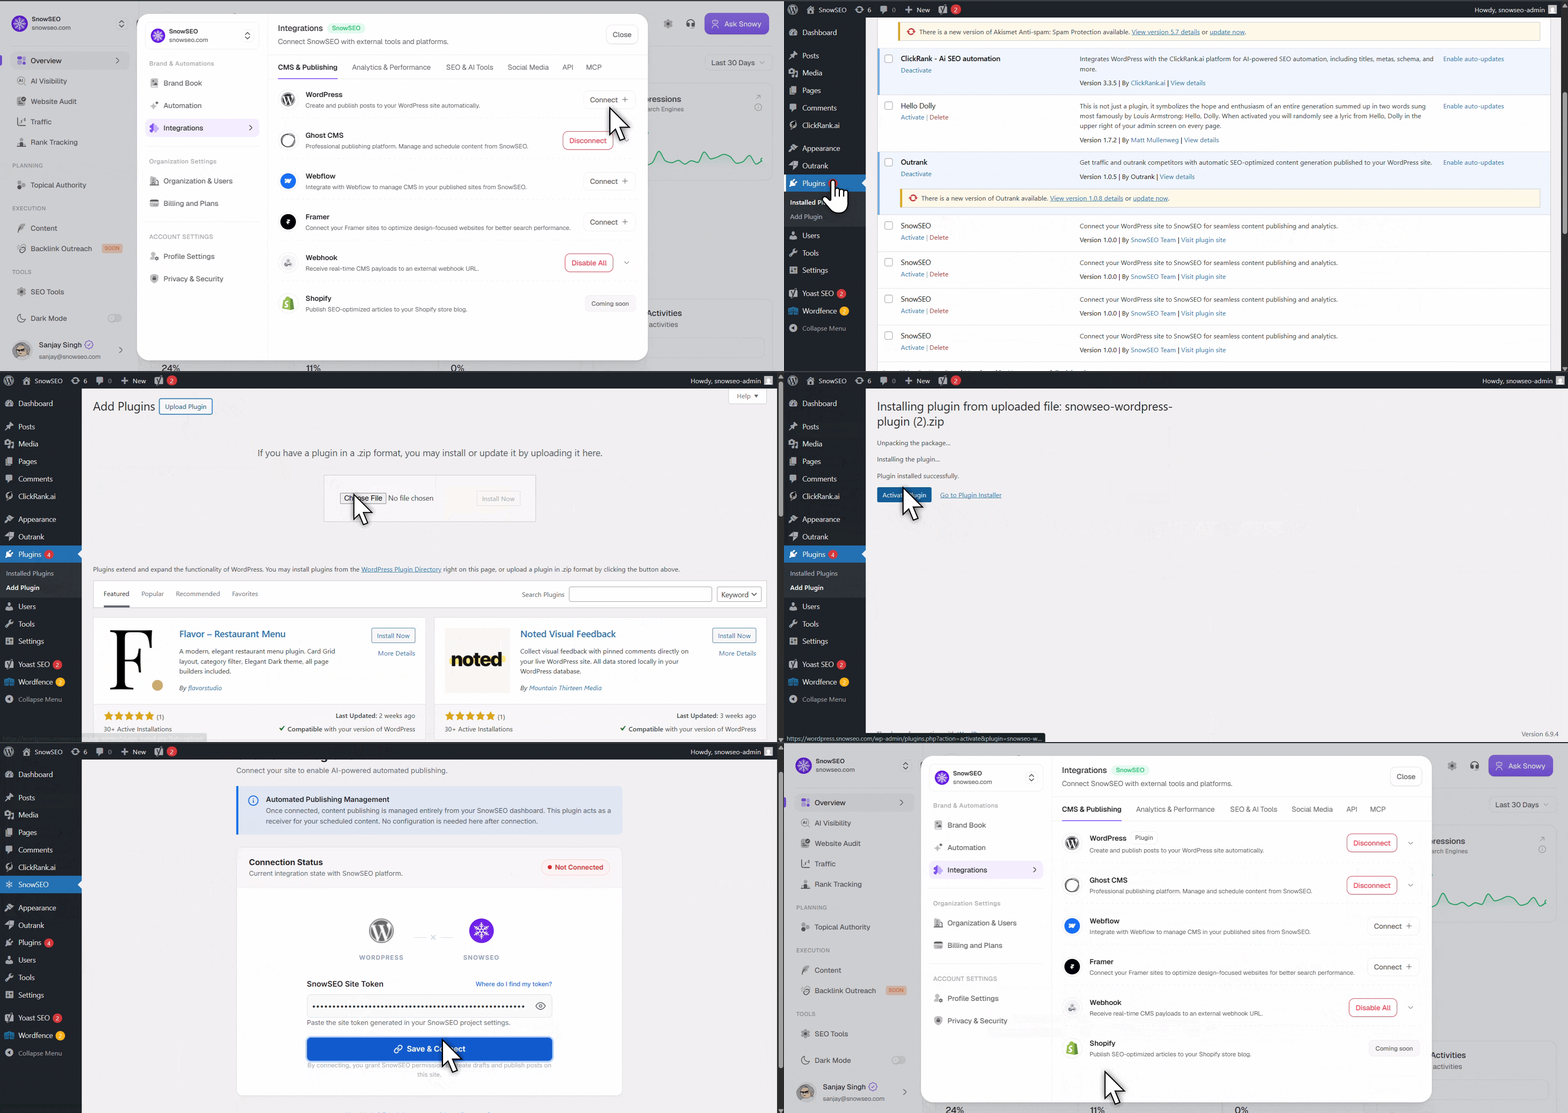 In SnowSEO, expand the WordPress panel and select the **Plugin** tab.
Click **Download Plugin** to download the `.zip` file.
In your WordPress admin:
1. Go to **Plugins → Add New → Upload Plugin**
2. Upload the downloaded `.zip` file
3. Click **Install Now**, then **Activate**
Back in SnowSEO, click **Generate API Key**. A unique key appears (e.g., `sw_live_941cbd0fbbcf...`). Click the copy button.
In WordPress, open **SnowSEO** in the admin sidebar, paste the site token from SnowSEO (Plugin tab → **Generate API Key**), and click **Save & Connect**.
In SnowSEO, the Connect button shows **Waiting for activation** with a spinner. Once the plugin validates the key with SnowSEO's servers, the status automatically changes to **Connected**. This usually takes a few seconds.
If the status stays on "Waiting for activation" for more than a minute, check that your WordPress site can make outbound HTTPS requests to SnowSEO's API. Some hosts block outbound connections — contact your hosting provider if needed.
**Once connected**, the WordPress accordion shows:
* **Site Title** — Your WordPress site name
* **Site URL** — The connected domain
* **Connection Method** — Tag showing OAuth, App Password, or Plugin
* **Disconnect** button (red) — removes the integration
You can only have **one active CMS integration per brand**. If you connect WordPress, then try to connect Ghost, the previous connection gets replaced. Disconnect first if you want to switch platforms cleanly.
***
### Ghost CMS
Professional publishing platform. Connect your Ghost publication to manage and schedule content directly from SnowSEO.
In SnowSEO, expand the WordPress panel and select the **Plugin** tab.
Click **Download Plugin** to download the `.zip` file.
In your WordPress admin:
1. Go to **Plugins → Add New → Upload Plugin**
2. Upload the downloaded `.zip` file
3. Click **Install Now**, then **Activate**
Back in SnowSEO, click **Generate API Key**. A unique key appears (e.g., `sw_live_941cbd0fbbcf...`). Click the copy button.
In WordPress, open **SnowSEO** in the admin sidebar, paste the site token from SnowSEO (Plugin tab → **Generate API Key**), and click **Save & Connect**.
In SnowSEO, the Connect button shows **Waiting for activation** with a spinner. Once the plugin validates the key with SnowSEO's servers, the status automatically changes to **Connected**. This usually takes a few seconds.
If the status stays on "Waiting for activation" for more than a minute, check that your WordPress site can make outbound HTTPS requests to SnowSEO's API. Some hosts block outbound connections — contact your hosting provider if needed.
**Once connected**, the WordPress accordion shows:
* **Site Title** — Your WordPress site name
* **Site URL** — The connected domain
* **Connection Method** — Tag showing OAuth, App Password, or Plugin
* **Disconnect** button (red) — removes the integration
You can only have **one active CMS integration per brand**. If you connect WordPress, then try to connect Ghost, the previous connection gets replaced. Disconnect first if you want to switch platforms cleanly.
***
### Ghost CMS
Professional publishing platform. Connect your Ghost publication to manage and schedule content directly from SnowSEO.
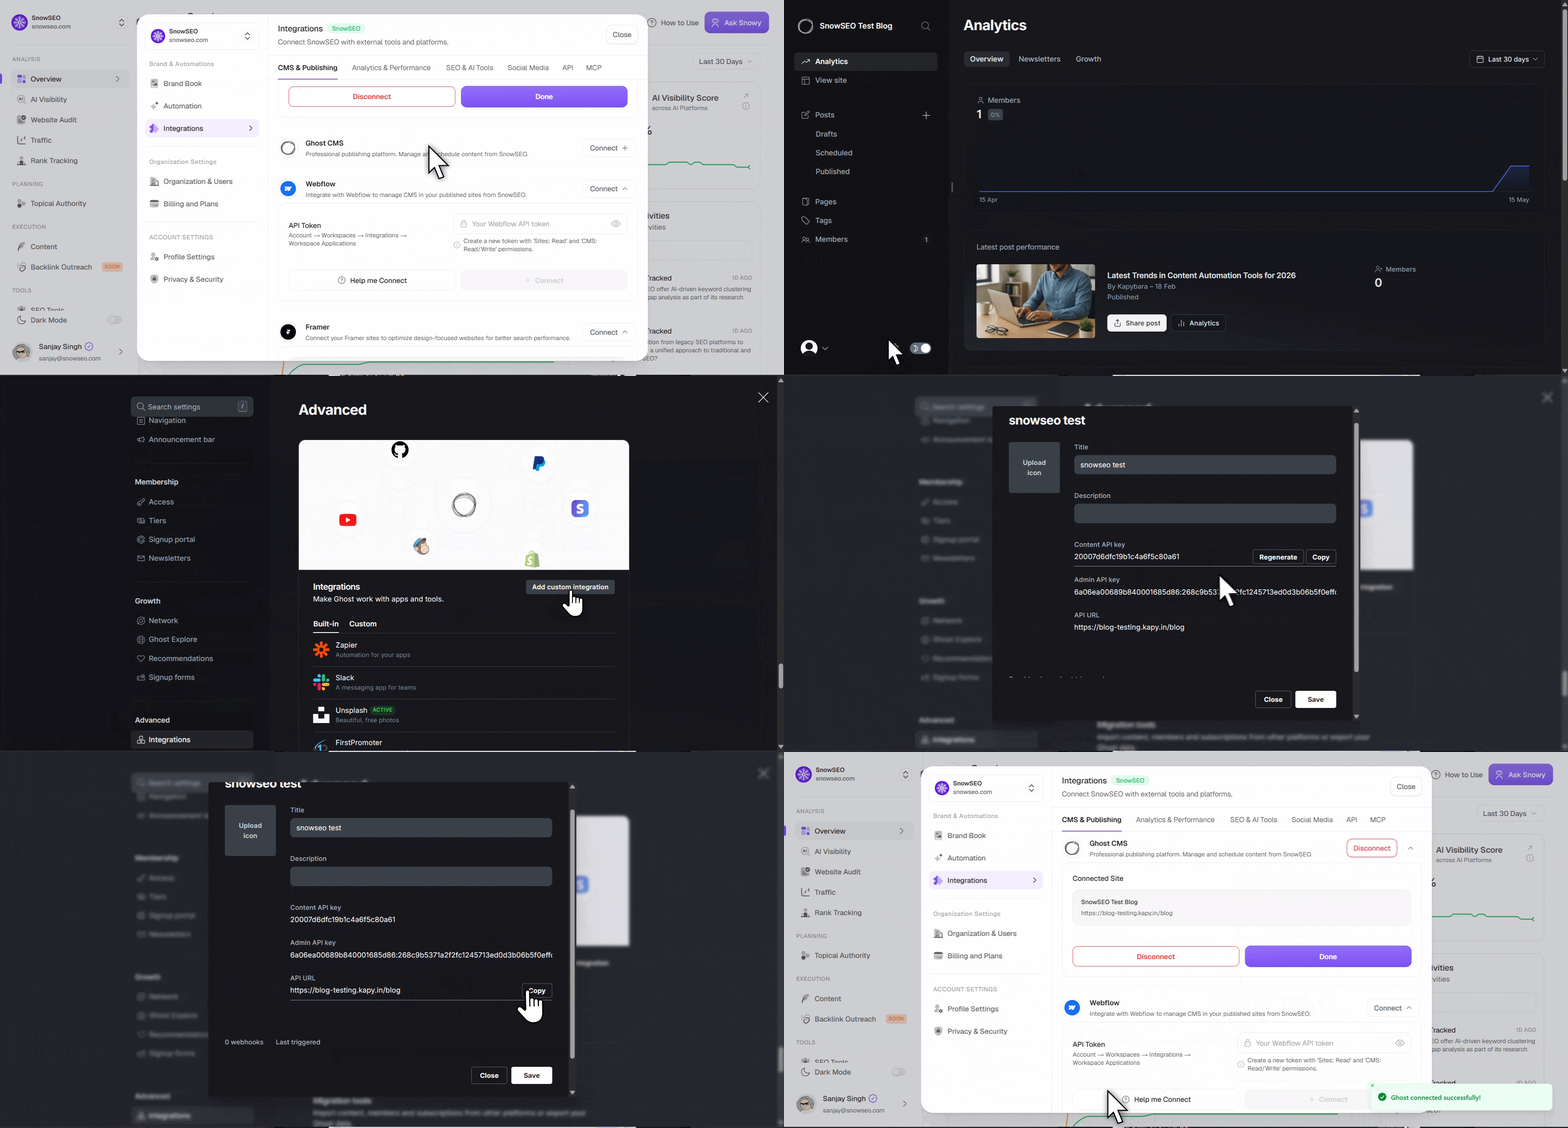 In SnowSEO, find Ghost CMS and click **Connect +**.
In your Ghost admin:
1. Go to **Settings → Integrations**
2. Click **Add custom integration** and name it "SnowSEO"
3. Ghost generates an **Admin API Key** and shows an **API URL** — keep this screen open
Copy the **Admin API Key** from the integration and paste it into the **Admin API Key** field.
Copy the **API URL** shown in the same integration (e.g., `https://your-site.ghost.io`) into the **API URL** field, then click **+ Connect**. Use this exact URL — **not** your public site domain. They are often different, and using the public domain can cause publishing to fail with an authentication error. The status changes to **Connected** once verified.
Use the **API URL** Ghost shows inside the custom integration, not your public-facing site address — on Ghost(Pro) with a custom domain these differ, and the public domain can redirect API requests in a way that drops authentication. The Admin API Key includes both a key ID and a secret in a single string — SnowSEO handles everything else. If you ever regenerate the key in Ghost, you'll need to reconnect SnowSEO with the new key.
***
### Webflow
Connect Webflow to manage CMS items on your published sites.
In SnowSEO, find Ghost CMS and click **Connect +**.
In your Ghost admin:
1. Go to **Settings → Integrations**
2. Click **Add custom integration** and name it "SnowSEO"
3. Ghost generates an **Admin API Key** and shows an **API URL** — keep this screen open
Copy the **Admin API Key** from the integration and paste it into the **Admin API Key** field.
Copy the **API URL** shown in the same integration (e.g., `https://your-site.ghost.io`) into the **API URL** field, then click **+ Connect**. Use this exact URL — **not** your public site domain. They are often different, and using the public domain can cause publishing to fail with an authentication error. The status changes to **Connected** once verified.
Use the **API URL** Ghost shows inside the custom integration, not your public-facing site address — on Ghost(Pro) with a custom domain these differ, and the public domain can redirect API requests in a way that drops authentication. The Admin API Key includes both a key ID and a secret in a single string — SnowSEO handles everything else. If you ever regenerate the key in Ghost, you'll need to reconnect SnowSEO with the new key.
***
### Webflow
Connect Webflow to manage CMS items on your published sites.
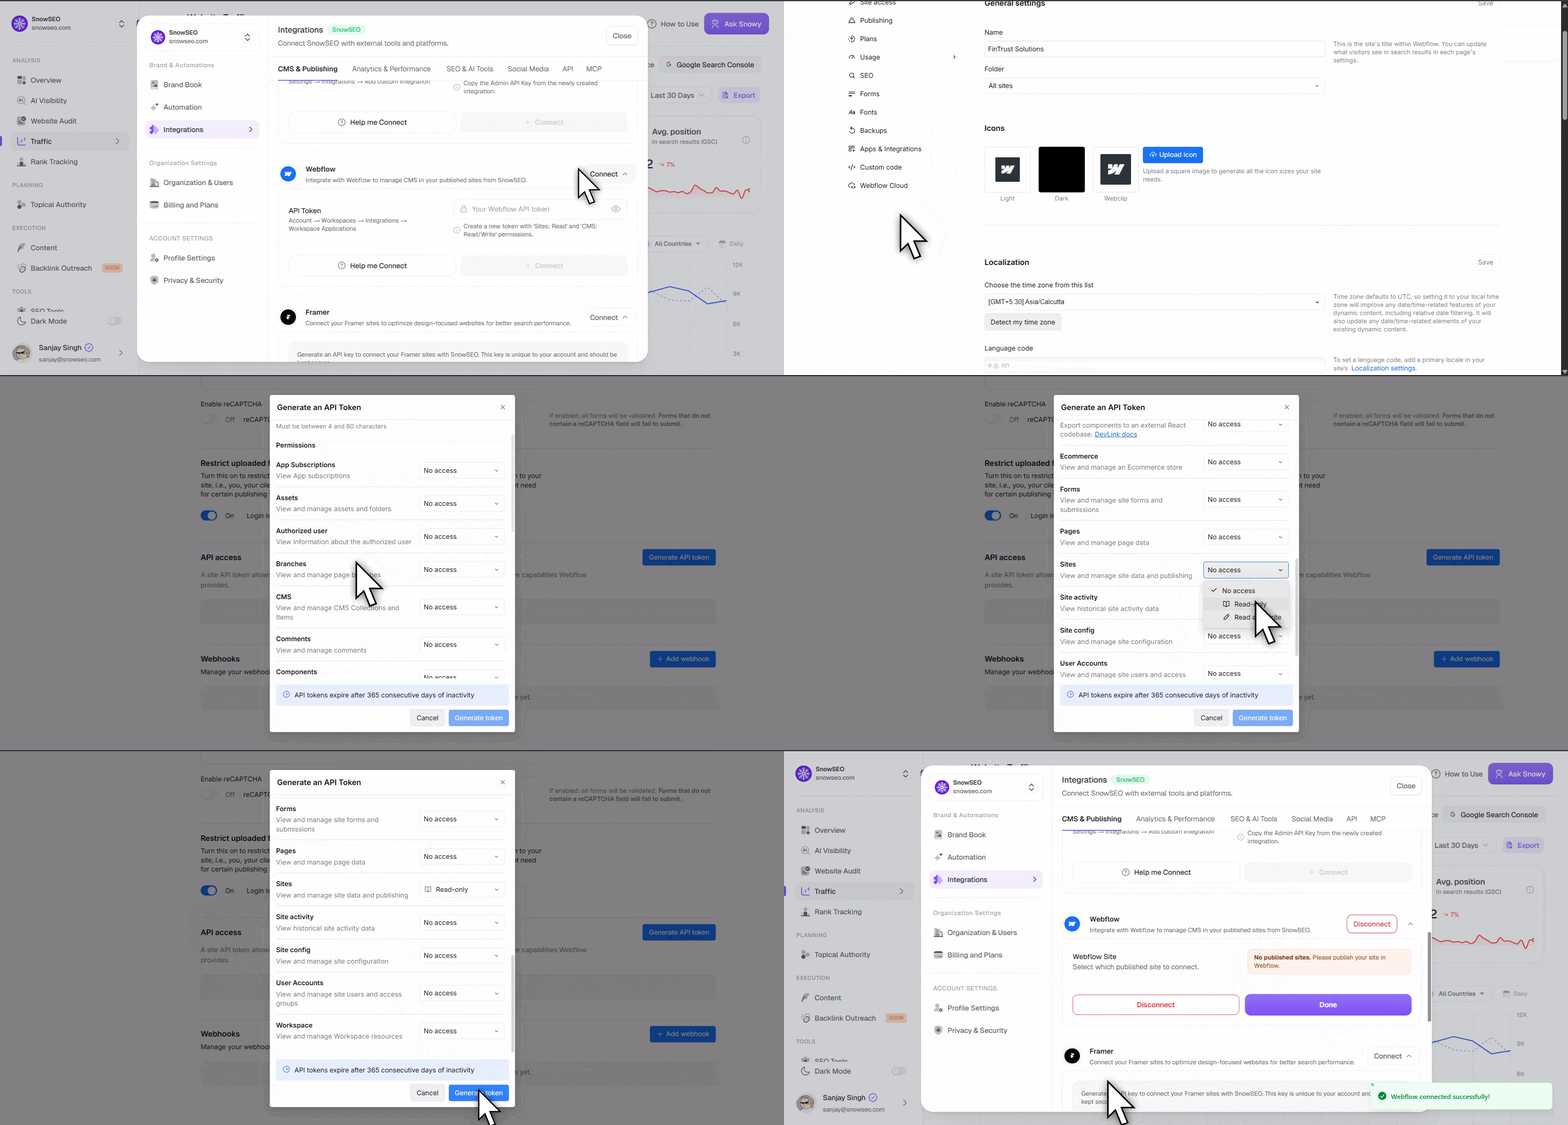 In SnowSEO, find Webflow and click **Connect +**.
In your Webflow dashboard:
1. Open the site you want to connect
2. Go to **Site settings → General**
3. Find your **Site ID** (a string like `1234567890abcdef`)
Leave this tab open — you'll need it after creating the token.
Still in Webflow:
1. Go to **Account → Integrations → API access**
2. Click **Generate API token**
3. Give it a name (e.g., "SnowSEO")
4. Enable **CMS Read & Write** access — required for publishing
5. Copy the token immediately — Webflow only shows it once
Back in SnowSEO:
1. Paste the **Site ID** into the first field
2. Paste the **API Token** into the second field
3. Click **+ Connect**
Once connected, you'll see two dropdowns:
* **Webflow Site** — Select which site to publish to
* **CMS Collection** — Select which collection (blog, articles, etc.)
The API Token is shown only **once** by Webflow. If you lose it, you must generate a new one in Webflow and reconnect. Keep it in a password manager until the SnowSEO connection is verified.
After connecting, make sure you've selected the correct **CMS Collection** in the expanded panel. SnowSEO will only publish to the collection you select. If you don't see any collections, make sure your site has at least one CMS collection defined in Webflow.
***
### Framer
Connect Framer to publish content directly into your Framer CMS. SnowSEO offers **two connection methods** — choose based on how hands-off you want publishing to be:
**Best for:** most users — publishes directly to your Framer CMS from SnowSEO's servers, so you **don't need to keep Framer open**.
SnowSEO writes articles straight into a Framer CMS collection using a project-scoped **Server API key**. This is Framer's official [Server API](https://www.framer.com/developers/server-api-introduction) (currently in open beta) and works on any Framer plan — no special tier required.
In your Framer project, open **Site Settings → General → API Keys** and click **Add**. Name it (e.g. "SnowSEO"), click **Create**, and **copy the key** — Framer shows it only once.
Open the project in the Framer **editor** and copy the address-bar URL — it looks like `https://framer.com/projects/YourSite--AbC123`. This is the **project** URL, **not** your published `.framer.app` site URL.
In SnowSEO, expand the **Framer** panel and select the **Server API** tab. Paste the **Project URL** and **Server API Key**, then click **Connect Project**. SnowSEO fetches your project's editable CMS collections.
Pick **Use existing collection** and select the blog/articles collection you want to publish into, or choose **Create SnowSEO collection** to have SnowSEO create a ready-made "SnowSEO Articles" collection for you (handy if the project has no CMS collection yet).
Match your SnowSEO article fields to Framer collection fields — **Title** and **Content** are required; **Image**, **Meta Description**, and **Created At** are optional. Common field names are auto-detected and pre-selected. Keep **Add SnowSEO tracking field** on (it's on by default).
Click **Save Framer Setup**. The status changes to **Connected** and you can publish articles straight to Framer.
**The "SnowSEO Article ID" tracking field is essential.** SnowSEO adds a hidden text field to your collection and stores each article's Framer item ID in it, so re-publishing an edited article **updates the same Framer item** instead of creating a duplicate. This is what makes "update live post" work — leave it enabled.
* **Draft vs. Published** — publishing as **Published** also deploys your Framer site so the item goes live; publishing as **Draft** leaves it as a CMS draft (not publicly visible) until you publish the Framer site.
* **Added a collection or field in Framer?** Use the **refresh** icon next to the collection dropdown to re-fetch collections and fields without reconnecting.
* **Change your setup later** — the connected panel has a **Reconfigure** button to switch collection or remap fields anytime.
**Best for:** a fallback when you can't use the Server API. Syncs content **only while the SnowSEO Framer plugin is open** inside Framer.
Expand the **Framer** panel, select the **Plugin Key** tab, and click **Generate Plugin Key**. Copy the key — it's shown once.
Open your Framer project, open the SnowSEO plugin, and paste the key where requested.
Content syncs while the plugin is open. Unlike the Server API method, publishing does not run in the background.
The Plugin Key is shown **once** after generation. Copy it immediately. If you lose it, click **Revoke Key** in the SnowSEO panel and generate a new one.
Prefer the **Server API** method whenever possible — it publishes without you needing to keep Framer open, and it's what powers scheduled and automated publishing to Framer.
***
### Grigora
Connect a Grigora project to create, update, schedule, and synchronize articles directly from SnowSEO. You can send an article as a **draft** for review or publish it immediately.
In your Grigora dashboard, open **Settings → Advanced → API**. Enter a descriptive name such as `SnowSEO`, click **Create**, and copy the generated key.
In SnowSEO, go to **Integrations → CMS & Publishing**, find **Grigora**, and click **Connect**.
Paste the key exactly as Grigora displayed it into the **API Key** field. Do not add `Bearer` or another prefix.
Enter the public base URL where readers access your posts, such as `your-site.com/blog`. SnowSEO automatically uses HTTPS and appends each article's slug to this URL.
Click **Connect**. SnowSEO verifies the key with Grigora before saving it. Once connected, the panel displays the public site URL and the Article Editor enables Grigora publishing and scheduling.
Grigora displays an API key only once. Store it securely when you create it. If you lose or revoke it, disconnect Grigora in SnowSEO, generate a new key, and reconnect.
**Publishing and synchronization behavior:**
* **Save as Draft in CMS** creates or updates a Grigora post with `draft` status.
* **Publish Now** creates or updates the post with `published` status.
* SnowSEO sends the article's formatted HTML, slug, categories, tags, SEO title and description, featured image, and summary.
* Re-publishing an already linked article updates the existing Grigora post instead of creating a duplicate.
* SnowSEO periodically reconciles the linked post's status, first-published time, and public URL with Grigora.
Set **Site URL** to the base path immediately before the article slug. For example, if a post is available at `https://example.com/blog/my-post`, enter `example.com/blog`. Grigora's create/update API returns the post ID and slug but not the public URL, so SnowSEO uses this base URL to build the article link.
See Grigora's [API key guide](https://help.grigora.co/developers/creating-and-authorizing-an-api-key) if you need help generating or revoking a key.
***
### Webhook
Receive real-time CMS publish payloads at your own endpoint. Unlike other CMS integrations, Webhook allows **multiple connections** — you can set up separate webhooks for different services (e.g., a Next.js blog, a custom headless CMS, and a Zapier automation).
> See a working [Next.js example on GitHub](https://github.com/Snow-SEO/custom-webhook-blog).
The panel expands. If you have no webhooks yet, an empty form appears automatically.
A descriptive name so your team can identify this connection (e.g., `Next.js Blog`, `Zapier Automation`). Must be 2–30 characters.
The destination URL where SnowSEO sends events (e.g., `https://your-site.com/api/webhook`). Must be **HTTPS** and publicly reachable. In development mode, `http://` URLs are also accepted.
A secret token you choose. SnowSEO sends this in the `Authorization` header as `Bearer `. Your endpoint should verify this token before processing payloads.
SnowSEO sends a `webhook.connected` validation ping to your endpoint, carrying your token in the `Authorization: Bearer` header. Your endpoint should verify that token and reply with a 2xx status — then the webhook is saved and connected. You can add more webhooks by clicking **Add New Webhook**.
Publish any article from the dashboard. Your endpoint should receive a `POST` request with the `article.published` or `article.drafted` event payload.
**Managing Webhooks:**
* Each webhook shows a row with its name, endpoint URL, and an **active/inactive toggle**
* Click the pencil icon to edit name, URL, or secret — SnowSEO re-validates by sending a `webhook.connected` ping after any credential change
* Click the trash icon to delete the webhook — SnowSEO sends a `webhook.disconnected` event to your endpoint before removal
* Use **Disable All** to turn off all webhooks at once
* Toggle **Send events even with another CMS** to have your webhook endpoints notified on every publish and unpublish, even when a CMS like WordPress or Ghost is the publish target. When off (the default), webhooks only fire when a webhook is the publish target. Your endpoints receive the same `article.published` / `article.drafted` / `article.unpublished` payloads; the article's CMS record stays owned by that CMS.
* The overall integration shows as "Connected" when at least one webhook is active
**Webhook Payload Structure:**
When SnowSEO publishes an article, your endpoint receives a `POST` request with the following JSON body:
```json theme={null}
{
"event": "article.published",
"timestamp": "2026-05-13T10:30:00.000Z",
"article": {
"slug": "my-article-slug",
"title": "My Article Title",
"markdown": "Full markdown content without the featured image...",
"html": "
In SnowSEO, find Webflow and click **Connect +**.
In your Webflow dashboard:
1. Open the site you want to connect
2. Go to **Site settings → General**
3. Find your **Site ID** (a string like `1234567890abcdef`)
Leave this tab open — you'll need it after creating the token.
Still in Webflow:
1. Go to **Account → Integrations → API access**
2. Click **Generate API token**
3. Give it a name (e.g., "SnowSEO")
4. Enable **CMS Read & Write** access — required for publishing
5. Copy the token immediately — Webflow only shows it once
Back in SnowSEO:
1. Paste the **Site ID** into the first field
2. Paste the **API Token** into the second field
3. Click **+ Connect**
Once connected, you'll see two dropdowns:
* **Webflow Site** — Select which site to publish to
* **CMS Collection** — Select which collection (blog, articles, etc.)
The API Token is shown only **once** by Webflow. If you lose it, you must generate a new one in Webflow and reconnect. Keep it in a password manager until the SnowSEO connection is verified.
After connecting, make sure you've selected the correct **CMS Collection** in the expanded panel. SnowSEO will only publish to the collection you select. If you don't see any collections, make sure your site has at least one CMS collection defined in Webflow.
***
### Framer
Connect Framer to publish content directly into your Framer CMS. SnowSEO offers **two connection methods** — choose based on how hands-off you want publishing to be:
**Best for:** most users — publishes directly to your Framer CMS from SnowSEO's servers, so you **don't need to keep Framer open**.
SnowSEO writes articles straight into a Framer CMS collection using a project-scoped **Server API key**. This is Framer's official [Server API](https://www.framer.com/developers/server-api-introduction) (currently in open beta) and works on any Framer plan — no special tier required.
In your Framer project, open **Site Settings → General → API Keys** and click **Add**. Name it (e.g. "SnowSEO"), click **Create**, and **copy the key** — Framer shows it only once.
Open the project in the Framer **editor** and copy the address-bar URL — it looks like `https://framer.com/projects/YourSite--AbC123`. This is the **project** URL, **not** your published `.framer.app` site URL.
In SnowSEO, expand the **Framer** panel and select the **Server API** tab. Paste the **Project URL** and **Server API Key**, then click **Connect Project**. SnowSEO fetches your project's editable CMS collections.
Pick **Use existing collection** and select the blog/articles collection you want to publish into, or choose **Create SnowSEO collection** to have SnowSEO create a ready-made "SnowSEO Articles" collection for you (handy if the project has no CMS collection yet).
Match your SnowSEO article fields to Framer collection fields — **Title** and **Content** are required; **Image**, **Meta Description**, and **Created At** are optional. Common field names are auto-detected and pre-selected. Keep **Add SnowSEO tracking field** on (it's on by default).
Click **Save Framer Setup**. The status changes to **Connected** and you can publish articles straight to Framer.
**The "SnowSEO Article ID" tracking field is essential.** SnowSEO adds a hidden text field to your collection and stores each article's Framer item ID in it, so re-publishing an edited article **updates the same Framer item** instead of creating a duplicate. This is what makes "update live post" work — leave it enabled.
* **Draft vs. Published** — publishing as **Published** also deploys your Framer site so the item goes live; publishing as **Draft** leaves it as a CMS draft (not publicly visible) until you publish the Framer site.
* **Added a collection or field in Framer?** Use the **refresh** icon next to the collection dropdown to re-fetch collections and fields without reconnecting.
* **Change your setup later** — the connected panel has a **Reconfigure** button to switch collection or remap fields anytime.
**Best for:** a fallback when you can't use the Server API. Syncs content **only while the SnowSEO Framer plugin is open** inside Framer.
Expand the **Framer** panel, select the **Plugin Key** tab, and click **Generate Plugin Key**. Copy the key — it's shown once.
Open your Framer project, open the SnowSEO plugin, and paste the key where requested.
Content syncs while the plugin is open. Unlike the Server API method, publishing does not run in the background.
The Plugin Key is shown **once** after generation. Copy it immediately. If you lose it, click **Revoke Key** in the SnowSEO panel and generate a new one.
Prefer the **Server API** method whenever possible — it publishes without you needing to keep Framer open, and it's what powers scheduled and automated publishing to Framer.
***
### Grigora
Connect a Grigora project to create, update, schedule, and synchronize articles directly from SnowSEO. You can send an article as a **draft** for review or publish it immediately.
In your Grigora dashboard, open **Settings → Advanced → API**. Enter a descriptive name such as `SnowSEO`, click **Create**, and copy the generated key.
In SnowSEO, go to **Integrations → CMS & Publishing**, find **Grigora**, and click **Connect**.
Paste the key exactly as Grigora displayed it into the **API Key** field. Do not add `Bearer` or another prefix.
Enter the public base URL where readers access your posts, such as `your-site.com/blog`. SnowSEO automatically uses HTTPS and appends each article's slug to this URL.
Click **Connect**. SnowSEO verifies the key with Grigora before saving it. Once connected, the panel displays the public site URL and the Article Editor enables Grigora publishing and scheduling.
Grigora displays an API key only once. Store it securely when you create it. If you lose or revoke it, disconnect Grigora in SnowSEO, generate a new key, and reconnect.
**Publishing and synchronization behavior:**
* **Save as Draft in CMS** creates or updates a Grigora post with `draft` status.
* **Publish Now** creates or updates the post with `published` status.
* SnowSEO sends the article's formatted HTML, slug, categories, tags, SEO title and description, featured image, and summary.
* Re-publishing an already linked article updates the existing Grigora post instead of creating a duplicate.
* SnowSEO periodically reconciles the linked post's status, first-published time, and public URL with Grigora.
Set **Site URL** to the base path immediately before the article slug. For example, if a post is available at `https://example.com/blog/my-post`, enter `example.com/blog`. Grigora's create/update API returns the post ID and slug but not the public URL, so SnowSEO uses this base URL to build the article link.
See Grigora's [API key guide](https://help.grigora.co/developers/creating-and-authorizing-an-api-key) if you need help generating or revoking a key.
***
### Webhook
Receive real-time CMS publish payloads at your own endpoint. Unlike other CMS integrations, Webhook allows **multiple connections** — you can set up separate webhooks for different services (e.g., a Next.js blog, a custom headless CMS, and a Zapier automation).
> See a working [Next.js example on GitHub](https://github.com/Snow-SEO/custom-webhook-blog).
The panel expands. If you have no webhooks yet, an empty form appears automatically.
A descriptive name so your team can identify this connection (e.g., `Next.js Blog`, `Zapier Automation`). Must be 2–30 characters.
The destination URL where SnowSEO sends events (e.g., `https://your-site.com/api/webhook`). Must be **HTTPS** and publicly reachable. In development mode, `http://` URLs are also accepted.
A secret token you choose. SnowSEO sends this in the `Authorization` header as `Bearer `. Your endpoint should verify this token before processing payloads.
SnowSEO sends a `webhook.connected` validation ping to your endpoint, carrying your token in the `Authorization: Bearer` header. Your endpoint should verify that token and reply with a 2xx status — then the webhook is saved and connected. You can add more webhooks by clicking **Add New Webhook**.
Publish any article from the dashboard. Your endpoint should receive a `POST` request with the `article.published` or `article.drafted` event payload.
**Managing Webhooks:**
* Each webhook shows a row with its name, endpoint URL, and an **active/inactive toggle**
* Click the pencil icon to edit name, URL, or secret — SnowSEO re-validates by sending a `webhook.connected` ping after any credential change
* Click the trash icon to delete the webhook — SnowSEO sends a `webhook.disconnected` event to your endpoint before removal
* Use **Disable All** to turn off all webhooks at once
* Toggle **Send events even with another CMS** to have your webhook endpoints notified on every publish and unpublish, even when a CMS like WordPress or Ghost is the publish target. When off (the default), webhooks only fire when a webhook is the publish target. Your endpoints receive the same `article.published` / `article.drafted` / `article.unpublished` payloads; the article's CMS record stays owned by that CMS.
* The overall integration shows as "Connected" when at least one webhook is active
**Webhook Payload Structure:**
When SnowSEO publishes an article, your endpoint receives a `POST` request with the following JSON body:
```json theme={null}
{
"event": "article.published",
"timestamp": "2026-05-13T10:30:00.000Z",
"article": {
"slug": "my-article-slug",
"title": "My Article Title",
"markdown": "Full markdown content without the featured image...",
"html": "Converted HTML content...
",
"status": "publish",
"language": "es",
"categories": ["Guides", "Product"],
"tags": ["SEO", "How-To"],
"featuredImage": {
"url": "https://example.com/image.jpg",
"caption": "Image caption or null"
},
"cms": {
"provider": "wordpress",
"articleId": "123",
"url": "https://your-site.com/blog/my-article"
},
"metaData": {
"metaTitle": "SEO Meta Title",
"metaDescription": "SEO meta description...",
"ogTitle": "Open Graph Title",
"ogDescription": "Open Graph Description",
"canonicalUrl": "https://example.com/my-article-slug",
"twitterTitle": "Twitter Card Title",
"twitterDescription": "Twitter Card Description"
}
}
}
```
`categories` and `tags` are string arrays of the article's taxonomy (empty arrays when none are assigned). If your receiver's CMS supports categories/tags, map them — creating any that don't exist yet.
`language` is the raw language code the article was written in — always a code, never a display name, so map it yourself. It is a lowercase two-letter code (`en`, `es`, `de`) with three exceptions to handle: Chinese is sent as `zh_CN` or `zh_TW`, and Hebrew is sent as `iw` (the legacy code Google uses, not `he`). Treat the value as an opaque identifier rather than assuming strict ISO 639-1. It reflects the brand's **Writing Language** (Settings ▸ Content & CMS ▸ Articles) at the time the article was created, so it stays stable even if that setting changes later. Articles created before this field existed report the brand's default language.
The `cms` object is present **only** when the event fired alongside a real CMS publish/unpublish (the "Send events even with another CMS" toggle). It carries that CMS's own post `provider`, `articleId`, and `url` (`url` omitted on unpublish) so your automation can correlate the SnowSEO article with the WordPress/Ghost/etc. post. It is absent when the webhook is the primary publish target.
**Event Types:**
* `article.published` — Sent when an article is published
* `article.drafted` — Sent when an article is saved as draft
* `article.unpublished` — Sent when an article is unpublished or removed
* `webhook.connected` — One-time validation ping sent after connecting or updating credentials
* `webhook.disconnected` — Sent to your endpoint before the webhook is removed
**Response (optional):**
Your endpoint can optionally return JSON with `cmsArticleId` and/or `cmsUrl` to store CMS metadata back to SnowSEO:
```json theme={null}
{
"cmsArticleId": "your-internal-article-id",
"cmsUrl": "https://your-site.com/articles/my-article-slug"
}
```
Always validate the `Authorization` Bearer token in your webhook handler. Log failed requests for easier debugging. The access token is encrypted at rest but sent in plaintext with each request.
***
### Shopify
**Coming soon.** Publish SEO-optimized articles to your Shopify store blog. The integration fields are already built — connect your shop domain and Admin API access token once released.
 This opens the Integrations drawer with tabs organized by function: **CMS & Publishing**, **Analytics & Performance**, **SEO & AI Tools**, **Social Media**, **API**, and **MCP**.
Each integration uses an accordion pattern — click the row to expand it and see connection details.
***
## Recommendations: What to Connect First
Not all integrations are equally important. Here's the priority order:
| Priority | Integration | Why |
| -------- | --------------------------------- | ------------------------------------------------------------------------------------------------------------------------------------------------------ |
| **1st** | Google Search Console | Without it, SnowSEO cannot show your real search traffic, keyword positions, or click-through rates. This is the foundation of almost every dashboard. |
| **2nd** | Your CMS (WordPress, Ghost, etc.) | Unlocks **Publish** and **Schedule** buttons in the Article Editor so you can push content live without copy-pasting. |
| **3rd** | Google Analytics | Enables **Content ROI** and **Website Traffic** metrics on published articles. |
| **4th** | Bing Webmaster Tools | Captures the \~6–10% of search traffic that comes from Bing, especially if your audience skews enterprise or older demographics. |
| **5th** | PostHog | If you run a SaaS product, this connects product analytics with your SEO performance data. |
***
This opens the Integrations drawer with tabs organized by function: **CMS & Publishing**, **Analytics & Performance**, **SEO & AI Tools**, **Social Media**, **API**, and **MCP**.
Each integration uses an accordion pattern — click the row to expand it and see connection details.
***
## Recommendations: What to Connect First
Not all integrations are equally important. Here's the priority order:
| Priority | Integration | Why |
| -------- | --------------------------------- | ------------------------------------------------------------------------------------------------------------------------------------------------------ |
| **1st** | Google Search Console | Without it, SnowSEO cannot show your real search traffic, keyword positions, or click-through rates. This is the foundation of almost every dashboard. |
| **2nd** | Your CMS (WordPress, Ghost, etc.) | Unlocks **Publish** and **Schedule** buttons in the Article Editor so you can push content live without copy-pasting. |
| **3rd** | Google Analytics | Enables **Content ROI** and **Website Traffic** metrics on published articles. |
| **4th** | Bing Webmaster Tools | Captures the \~6–10% of search traffic that comes from Bing, especially if your audience skews enterprise or older demographics. |
| **5th** | PostHog | If you run a SaaS product, this connects product analytics with your SEO performance data. |
***